Monday, 18 September 2017

Interactive Reports: Button Positions

When we add any buttons to IR and select button position as "Right of Interactive Report Search Bar" we notice that the buttons gets displayed in right corner of the report. Looks something like below  image:


There is no pre-defined option within APEX to move these buttons to other positions. This can be achieved by using some custom CSS.

For example, If I want to align buttons right next to Action Menu in Interactive Report then I can use the below CSS:

.a-IRR-toolbar {
  display: flex;
}

.a-IRR-buttons {
  display: flex;
  flex-grow: 1;
  justify-content: flex-start;
}

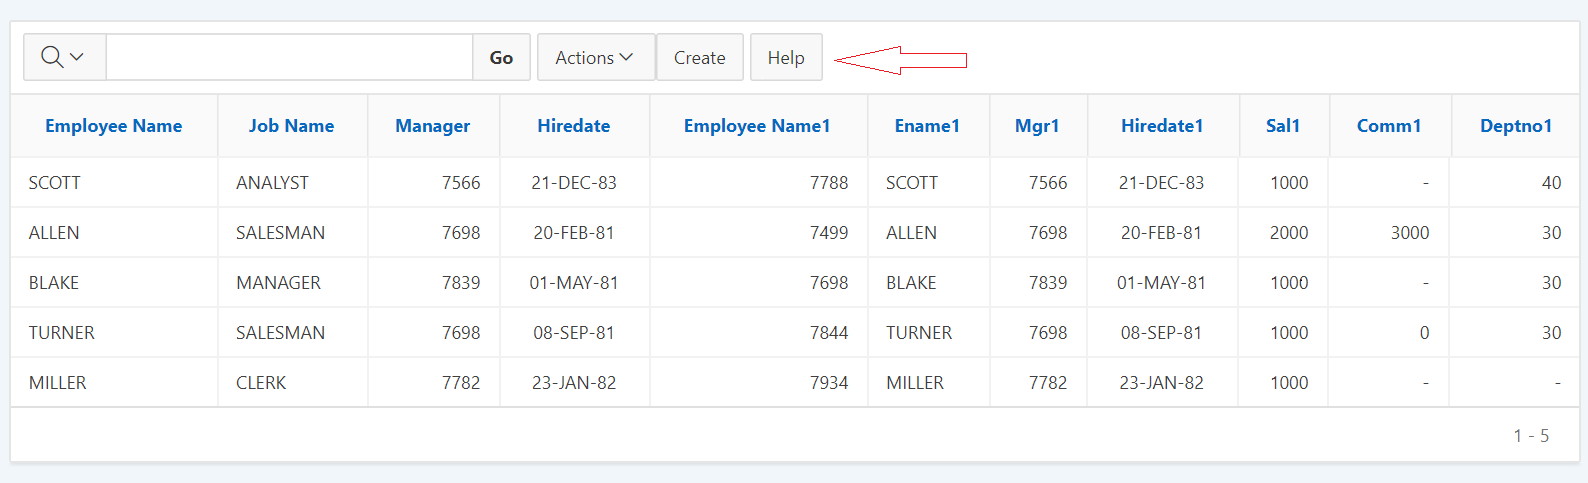
Use the above code in the CSS inline section of the page. Result would be something like the image below:


Here is the link to the DEMO application: https://apex.oracle.com/pls/apex/f?p=110214:3
UserName/Password: demo/demo

You can play with different values of justify-content property to make the buttons display in different positions. It can take below mentioned values:
justify-content: flex-start|flex-end|center|space-between|space-around|initial|inherit;

Below are the details for each property values.
flex-start > Default value. Items are positioned at the beginning of the container
flex-end > Items are positioned at the end of the container
center > Items are positioned at the center of the container
space-between > Items are positioned with space between the lines
space-around > Items are positioned with space before, between, and after the lines
initial > Sets this property to its default value.
inherit > Inherits this property from its parent element.

Hope this helps.

Cheers,
Prashanth


Friday, 31 March 2017

Universal Theme sidebar menu tooltip

If your sidebar text is too long, APEX truncates it to some fixed width. Here comes the use of Tool Tip option for the side bar. Also if you make the sidebar navigation menu collapsed by default and when only the icons are displayed, This Tool Tip will be helpful to understand the menu better.

Here are the simple steps to achieve this tool-tip functionality.

1) Create an Global Page (Page 0) if its not already present.
2) In Page 0, Create a Dynamic Action on Page Load.
3) Select Action as "Execute JavaScript Code" and paste the below code in its source.

//Tooltip for Menu Text
$("#t_TreeNav").treeView("option", "tooltip", {
    content: function(cb, node) {
        return node.label;
    }
} );
 //This tells the tooltip to show up for the whole node content including the icon.
$("#t_TreeNav").tooltip("option", "items", ".a-TreeView-content");

In the above piece of code "t_TreeNav" is the ID of the sidebar navigation tree which is set by default in Universal Theme.

Once the Dynamic Action is created, Run the application and hover the mouse through Sidebar menu to see the Tool Tip in action.

Below is the sample application which demonstrates the use of tool-tip.
https://apex.oracle.com/pls/apex/f?p=83384

Cheers!!!!

Interactive Grid - Remove Default First Row Selected

APEX 5.1 has an very powerful reporting feature called Interactive Grid (IG).
When you create an Interactive Grid with RowSelector, you might have noticed that by default the the first row gets selected. This is how the Interactive Grids are designed.

But there might be an requirement where none of the check-box must be selected on landing to the screen. Hence we need to remove the first row default selection in Interactive Grid.

This can be achieved from below simple code:

Use the below code when the page loads. You can either create an Dynamic Action or add this code in "Execute when Page Loads" section of the page Javascript


var ig$ = apex.region("emp").widget();
ig$.interactiveGrid("getViews", ig$.interactiveGrid("getCurrentViewId")).setSelection($());

Change "emp" to whatever your Interactive Grid static id is.

This should remove your default first row selection from your IG. Hope this helps.

Monday, 6 March 2017

Refer Packaged Application Icons in APEX 5.0

Here is an easiest way to use some of the packaged application icons for your applications.
This can be done by including the packaged applications CSS file in your application, and reference the appropriate CSS class for the icon you need.

1) Navigate to Edit Application Definition -> User Interface, and edit the interface for your application.


2) Under Cascading Style Sheets add the this CSS file: #IMAGE_PREFIX#pkgapp_ui/css/5.0#MIN#.css
In your application create a div with a height and width, and include one of the icon classes to display the icon.

<div style="height: 100px; width: 100px;" class="app-application-standards-tracker"></div>

Here are the available packaged application icons:


Monday, 4 August 2014

Ensuring a button is clicked only once

THE EFFECT
Click here to view the effect. You will notice that as soon as you click either of the buttons, the button is greyed out and its text is changed to “Submitted…”

STEP 1
Create a button of type “Create a button in a region position”.

STEP 2
Set the button’s target to be a URL.

STEP 3
If you do not want a confirm dialog with the button, set the button’s URL target to the following:
javascript:this.disabled=true;
this.value='Submitted...';
doSubmit('XXXXXX');

If you DO want a confirm dialog with the button, set the button’s URL target to the following:
javascript:if (confirm('Are you sure you want to?')) {
this.disabled=true; this.value='Submitted...';
doSubmit('XXXXXX');
}

In either case you should change the value of XXXXXX to be the same as the name of the button. This is the value that REQUEST will be set to when the button is clicked. By setting it to be the same as the name of the button it means that you can still use “When Button Pressed” conditions for this button.

Monday, 23 December 2013

Set maxLength in tabular form Text Field

Text Fields do not have maxLength property in tabular forms. The default maxLength for a tabular form text field is 2000. This fails to restrict the text-field with custom length. However there always a workaround :)

You can use the following steps to influence this value at runtime.

1) Edit the column attributes for the tabular form column.
2) In the Tabular Form Element region - Element Attributes field enter the following (set the value 20 to the length you desire):

onFocus="javascript:this.maxLength=20;"

Note: The maxLength keyword is case-sensitive.

This will restrict the text-field to accept only 20 characters.

Cheers,
Prashanth

Friday, 22 November 2013

Report Freeze/Fix Column Header

Hi Guys,

Today I would like to share "How to Freeze/Fix Column Header Row of a Classic Report" which I found very useful when the number of report columns/rows are more per screen.

Have a look into the working example of this implementation: Report_Column_Header_Freeze_Demo

This can be achieved from the below mentioned steps:

Step 1: Create an classic report and provide an static id to your report.

Step 2: Create an custom report template. Add the below mentioned codes while creating the template in respective section:
Note: I have used the theme "Traditional Blue-20" in my application.

Template Name: Horz/Vert Scroll (Custom 1)
Template Class: Custom 1

Before Rows:
<style>#report_#REGION_STATIC_ID# table </style>
<table cellpadding="0" border="0" cellspacing="0" summary="" #REPORT_ATTRIBUTES# id="report_#REGION_STATIC_ID#">#TOP_PAGINATION#
<tr><td><div id="lh_#REGION_STATIC_ID#" >
<table cellpadding="0" border="1" cellspacing="0" summary="" class="report-standard" bgcolor="#CFE0F1" > </table>
</div></td><td><div id="rh_#REGION_STATIC_ID#">
<table cellpadding="0" border="1" cellspacing="0" summary="" class="report-standard" bgcolor="#CFE0F1"> </table>
</div></td></tr><tr><td><div id="lb_#REGION_STATIC_ID#">
<table cellpadding="0" border="1" cellspacing="0" summary="" class="report-standard" bgcolor="#F2F2F5"> </table>
</div></td><td><div id="rb_#REGION_STATIC_ID#">
<table cellpadding="0" border="1" cellspacing="0" summary="" class="report-standard" bgcolor="#F2F2F5">

Column Heading Template:
<th#ALIGNMENT# align="center" id="#COLUMN_HEADER_NAME#" class="header">#COLUMN_HEADER#</th>

Before Each Row:
<tr #HIGHLIGHT_ROW#>

Column Template 1:
<td#ALIGNMENT# align="center" headers="#COLUMN_HEADER_NAME#" class="data">#COLUMN_VALUE#</td>

After Each Row:
</tr>

After Rows:
 </table></div><div class="CVS">#EXTERNAL_LINK##CSV_LINK#</div></td></tr>
#PAGINATION#

</table>


Pagination Sub-template: This piece of code will be the same as in other template.


Step 3: Put the below piece of code in JavaScript > Function and Global Variable Declaration section of the page.

(function($){$.fn.htmldbDscroll=function(opt){
 opt=$.extend({
  width:1250,
  height:280,
  freezeColumns:1,
  freezeRows:1,
  addCellWidth:50,
  addRowHeight:2,
  addTblWidth:12,
  scrollWidth:18
 },opt);

 if(opt.freezeColumns<1&&opt.freezeRows<1){
  return this;
 }

 return this.each(function(i){

  var lId=this.id.substr(6)
  /* styles */
  $("#lh"+lId).css({"right":"0","bottom":"0"}).parent().css({"right":"0","bottom":"0"});
  $("#rh"+lId).css({"overflow-x":"hidden","width":opt.width-opt.scrollWidth,"left":"0","bottom":"0"}).parent().css({"bottom":"0"});
  $("#lb"+lId).css({"overflow-y":"hidden","height":opt.height-opt.scrollWidth,"right":"0","top":"0"}).parent().css({"right":"0","top":"0","vertical-align":"top"});
  $("#rb"+lId).css({"overflow":"scroll","width":opt.width,"height":opt.height});

  /* report cell width */
  if(opt.freezeRows>0){
   $("#rb"+lId).find("tr:first,tr:eq("+opt.freezeRows+")").children().each(function(){    
    var w=$(this).width()+opt.addCellWidth;
    $(this).width(w);
   });
  }else{
   $("#rb"+lId).find("tr:first").children().each(function(){
    var w=$(this).width()+opt.addCellWidth;
    $(this).width(w);
   });
  }

  /* row process */
  if(opt.freezeColumns>0){
   $("#rb"+lId).find("tr").each(function(j){
    var t1=$(this);
    /* set row height and copy row */
    var h=t1.height()+opt.addRowHeight;
    t1.height(h);
    var t2=t1.clone().empty().append(t1.children(":lt("+opt.freezeColumns+")"));
    if(j>(opt.freezeRows-1)){
     $("#lb"+lId).children().append(t2);
    }else{
     $("#rh"+lId).children().append(t1);
     $("#lh"+lId).children().append(t2);
    }
   });
  }else{
   for(var j=0;j<=(opt.freezeRows-1);j++){
    $("#rh"+lId).children().append($("#rb"+lId).find("tr:eq("+j+")"));
   }
  }

  /* table width */
  if(opt.freezeColumns>0){
   if($("#lh"+lId).children().width()>$("#lb"+lId).children().width()){
    var w=$("#lh"+lId).children().width();
    $("#lb"+lId).children().width(w);
    $("#lh"+lId).children().width(w);
   }else{
    var w=$("#lb"+lId).children().width();
    $("#lh"+lId).children().width(w);
    $("#lb"+lId).children().width(w);
   }
  }
  if($("#rh"+lId).children().width()>$("#rb"+lId).children().width()){
   var h=$("#rh"+lId).children().width()+opt.addTblWidth;
   $("#rb"+lId).children().width(h);
   $("#rh"+lId).children().width(h);
  }else{
   var h=$("#lb"+lId).children().width()+opt.addTblWidth;
   $("#rh"+lId).children().width(h);
   $("#rb"+lId).children().width(h);
  }

  $("#rh"+lId).children().css({"table-layout":"fixed"});
  $("#rb"+lId).children().css({"table-layout":"fixed"});

  /* scroll */
  $("#rb"+lId).scroll(function(){
   $("#rh"+lId).scrollLeft(this.scrollLeft);
   $("#lb"+lId).scrollTop(this.scrollTop);
  });
 });

}})(jQuery);

Step 4Create an Dynamic action with the settings as mentioned below.

a. Create "set scroll" dynamic action with event as "After Refresh" and Region as your classic report region.


b. Create Action as "Execute Javascript Code" and apply the below mentioned code.

$("#report_NADD_PIPELINE").htmldbDscroll({freezeColumns:1});
Where NADD_PIPELINE is the STATIC_ID of my classic report.

Note: freezeColumns:1 in the above function will fix the 1st column. In-case you need to fix first 2 or 3 columns then change its numbering to 2 or 3 accordingly (ex: freezeColumns:2).


Step 5: You are all good to go and test your report header freeze functionality :)


Universal Theme - Side Navigation Menu Child Entry Icon Alignment

Hi, There is an issue with the Side Navigation Menu Child Entry Icon Alignment in Universal theme if you are using APEX 5.1 or prior vers...