Hi Guys,
Today I would like to share "How to Freeze/Fix Column Header Row of a Classic Report" which I found very useful when the number of report columns/rows are more per screen.
Have a look into the working example of this implementation: Report_Column_Header_Freeze_Demo
This can be achieved from the below mentioned steps:
Step 1: Create an classic report and provide an static id to your report.

Step 2: Create an custom report template. Add the below mentioned codes while creating the template in respective section:
Note: I have used the theme "Traditional Blue-20" in my application.
Template Name: Horz/Vert Scroll (Custom 1)
Template Class: Custom 1
Before Rows:
<style>#report_#REGION_STATIC_ID# table </style>
<table cellpadding="0" border="0" cellspacing="0" summary="" #REPORT_ATTRIBUTES# id="report_#REGION_STATIC_ID#">#TOP_PAGINATION#
<tr><td><div id="lh_#REGION_STATIC_ID#" >
<table cellpadding="0" border="1" cellspacing="0" summary="" class="report-standard" bgcolor="#CFE0F1" > </table>
</div></td><td><div id="rh_#REGION_STATIC_ID#">
<table cellpadding="0" border="1" cellspacing="0" summary="" class="report-standard" bgcolor="#CFE0F1"> </table>
</div></td></tr><tr><td><div id="lb_#REGION_STATIC_ID#">
<table cellpadding="0" border="1" cellspacing="0" summary="" class="report-standard" bgcolor="#F2F2F5"> </table>
</div></td><td><div id="rb_#REGION_STATIC_ID#">
<table cellpadding="0" border="1" cellspacing="0" summary="" class="report-standard" bgcolor="#F2F2F5">
Column Heading Template:
<th#ALIGNMENT# align="center" id="#COLUMN_HEADER_NAME#" class="header">#COLUMN_HEADER#</th>
Before Each Row:
<tr #HIGHLIGHT_ROW#>
Column Template 1:
<td#ALIGNMENT# align="center" headers="#COLUMN_HEADER_NAME#" class="data">#COLUMN_VALUE#</td>
After Each Row:
</tr>
After Rows:
</table></div><div class="CVS">#EXTERNAL_LINK##CSV_LINK#</div></td></tr>
#PAGINATION#
</table>
Pagination Sub-template: This piece of code will be the same as in other template.
Step 3: Put the below piece of code in JavaScript > Function and Global Variable Declaration section of the page.
(function($){$.fn.htmldbDscroll=function(opt){
opt=$.extend({
width:1250,
height:280,
freezeColumns:1,
freezeRows:1,
addCellWidth:50,
addRowHeight:2,
addTblWidth:12,
scrollWidth:18
},opt);
if(opt.freezeColumns<1&&opt.freezeRows<1){
return this;
}
return this.each(function(i){
var lId=this.id.substr(6)
/* styles */
$("#lh"+lId).css({"right":"0","bottom":"0"}).parent().css({"right":"0","bottom":"0"});
$("#rh"+lId).css({"overflow-x":"hidden","width":opt.width-opt.scrollWidth,"left":"0","bottom":"0"}).parent().css({"bottom":"0"});
$("#lb"+lId).css({"overflow-y":"hidden","height":opt.height-opt.scrollWidth,"right":"0","top":"0"}).parent().css({"right":"0","top":"0","vertical-align":"top"});
$("#rb"+lId).css({"overflow":"scroll","width":opt.width,"height":opt.height});
/* report cell width */
if(opt.freezeRows>0){
$("#rb"+lId).find("tr:first,tr:eq("+opt.freezeRows+")").children().each(function(){
var w=$(this).width()+opt.addCellWidth;
$(this).width(w);
});
}else{
$("#rb"+lId).find("tr:first").children().each(function(){
var w=$(this).width()+opt.addCellWidth;
$(this).width(w);
});
}
/* row process */
if(opt.freezeColumns>0){
$("#rb"+lId).find("tr").each(function(j){
var t1=$(this);
/* set row height and copy row */
var h=t1.height()+opt.addRowHeight;
t1.height(h);
var t2=t1.clone().empty().append(t1.children(":lt("+opt.freezeColumns+")"));
if(j>(opt.freezeRows-1)){
$("#lb"+lId).children().append(t2);
}else{
$("#rh"+lId).children().append(t1);
$("#lh"+lId).children().append(t2);
}
});
}else{
for(var j=0;j<=(opt.freezeRows-1);j++){
$("#rh"+lId).children().append($("#rb"+lId).find("tr:eq("+j+")"));
}
}
/* table width */
if(opt.freezeColumns>0){
if($("#lh"+lId).children().width()>$("#lb"+lId).children().width()){
var w=$("#lh"+lId).children().width();
$("#lb"+lId).children().width(w);
$("#lh"+lId).children().width(w);
}else{
var w=$("#lb"+lId).children().width();
$("#lh"+lId).children().width(w);
$("#lb"+lId).children().width(w);
}
}
if($("#rh"+lId).children().width()>$("#rb"+lId).children().width()){
var h=$("#rh"+lId).children().width()+opt.addTblWidth;
$("#rb"+lId).children().width(h);
$("#rh"+lId).children().width(h);
}else{
var h=$("#lb"+lId).children().width()+opt.addTblWidth;
$("#rh"+lId).children().width(h);
$("#rb"+lId).children().width(h);
}
$("#rh"+lId).children().css({"table-layout":"fixed"});
$("#rb"+lId).children().css({"table-layout":"fixed"});
/* scroll */
$("#rb"+lId).scroll(function(){
$("#rh"+lId).scrollLeft(this.scrollLeft);
$("#lb"+lId).scrollTop(this.scrollTop);
});
});
}})(jQuery);
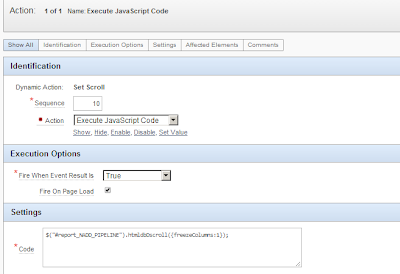
Step 4: Create an Dynamic action with the settings as mentioned below.
a. Create "set scroll" dynamic action with event as "After Refresh" and Region as your classic report region.

b. Create Action as "Execute Javascript Code" and apply the below mentioned code.
$("#report_NADD_PIPELINE").htmldbDscroll({freezeColumns:1});
Where NADD_PIPELINE is the STATIC_ID of my classic report.
Note: freezeColumns:1 in the above function will fix the 1st column. In-case you need to fix first 2 or 3 columns then change its numbering to 2 or 3 accordingly (ex: freezeColumns:2).
Step 5: You are all good to go and test your report header freeze functionality :)

Today I would like to share "How to Freeze/Fix Column Header Row of a Classic Report" which I found very useful when the number of report columns/rows are more per screen.
Have a look into the working example of this implementation: Report_Column_Header_Freeze_Demo
This can be achieved from the below mentioned steps:
Step 1: Create an classic report and provide an static id to your report.

Step 2: Create an custom report template. Add the below mentioned codes while creating the template in respective section:
Note: I have used the theme "Traditional Blue-20" in my application.
Template Name: Horz/Vert Scroll (Custom 1)
Template Class: Custom 1
Before Rows:
<style>#report_#REGION_STATIC_ID# table </style>
<table cellpadding="0" border="0" cellspacing="0" summary="" #REPORT_ATTRIBUTES# id="report_#REGION_STATIC_ID#">#TOP_PAGINATION#
<tr><td><div id="lh_#REGION_STATIC_ID#" >
<table cellpadding="0" border="1" cellspacing="0" summary="" class="report-standard" bgcolor="#CFE0F1" > </table>
</div></td><td><div id="rh_#REGION_STATIC_ID#">
<table cellpadding="0" border="1" cellspacing="0" summary="" class="report-standard" bgcolor="#CFE0F1"> </table>
</div></td></tr><tr><td><div id="lb_#REGION_STATIC_ID#">
<table cellpadding="0" border="1" cellspacing="0" summary="" class="report-standard" bgcolor="#F2F2F5"> </table>
</div></td><td><div id="rb_#REGION_STATIC_ID#">
<table cellpadding="0" border="1" cellspacing="0" summary="" class="report-standard" bgcolor="#F2F2F5">
Column Heading Template:
<th#ALIGNMENT# align="center" id="#COLUMN_HEADER_NAME#" class="header">#COLUMN_HEADER#</th>
Before Each Row:
<tr #HIGHLIGHT_ROW#>
Column Template 1:
<td#ALIGNMENT# align="center" headers="#COLUMN_HEADER_NAME#" class="data">#COLUMN_VALUE#</td>
After Each Row:
</tr>
After Rows:
</table></div><div class="CVS">#EXTERNAL_LINK##CSV_LINK#</div></td></tr>
#PAGINATION#
</table>
Pagination Sub-template: This piece of code will be the same as in other template.
Step 3: Put the below piece of code in JavaScript > Function and Global Variable Declaration section of the page.
(function($){$.fn.htmldbDscroll=function(opt){
opt=$.extend({
width:1250,
height:280,
freezeColumns:1,
freezeRows:1,
addCellWidth:50,
addRowHeight:2,
addTblWidth:12,
scrollWidth:18
},opt);
if(opt.freezeColumns<1&&opt.freezeRows<1){
return this;
}
return this.each(function(i){
var lId=this.id.substr(6)
/* styles */
$("#lh"+lId).css({"right":"0","bottom":"0"}).parent().css({"right":"0","bottom":"0"});
$("#rh"+lId).css({"overflow-x":"hidden","width":opt.width-opt.scrollWidth,"left":"0","bottom":"0"}).parent().css({"bottom":"0"});
$("#lb"+lId).css({"overflow-y":"hidden","height":opt.height-opt.scrollWidth,"right":"0","top":"0"}).parent().css({"right":"0","top":"0","vertical-align":"top"});
$("#rb"+lId).css({"overflow":"scroll","width":opt.width,"height":opt.height});
/* report cell width */
if(opt.freezeRows>0){
$("#rb"+lId).find("tr:first,tr:eq("+opt.freezeRows+")").children().each(function(){
var w=$(this).width()+opt.addCellWidth;
$(this).width(w);
});
}else{
$("#rb"+lId).find("tr:first").children().each(function(){
var w=$(this).width()+opt.addCellWidth;
$(this).width(w);
});
}
/* row process */
if(opt.freezeColumns>0){
$("#rb"+lId).find("tr").each(function(j){
var t1=$(this);
/* set row height and copy row */
var h=t1.height()+opt.addRowHeight;
t1.height(h);
var t2=t1.clone().empty().append(t1.children(":lt("+opt.freezeColumns+")"));
if(j>(opt.freezeRows-1)){
$("#lb"+lId).children().append(t2);
}else{
$("#rh"+lId).children().append(t1);
$("#lh"+lId).children().append(t2);
}
});
}else{
for(var j=0;j<=(opt.freezeRows-1);j++){
$("#rh"+lId).children().append($("#rb"+lId).find("tr:eq("+j+")"));
}
}
/* table width */
if(opt.freezeColumns>0){
if($("#lh"+lId).children().width()>$("#lb"+lId).children().width()){
var w=$("#lh"+lId).children().width();
$("#lb"+lId).children().width(w);
$("#lh"+lId).children().width(w);
}else{
var w=$("#lb"+lId).children().width();
$("#lh"+lId).children().width(w);
$("#lb"+lId).children().width(w);
}
}
if($("#rh"+lId).children().width()>$("#rb"+lId).children().width()){
var h=$("#rh"+lId).children().width()+opt.addTblWidth;
$("#rb"+lId).children().width(h);
$("#rh"+lId).children().width(h);
}else{
var h=$("#lb"+lId).children().width()+opt.addTblWidth;
$("#rh"+lId).children().width(h);
$("#rb"+lId).children().width(h);
}
$("#rh"+lId).children().css({"table-layout":"fixed"});
$("#rb"+lId).children().css({"table-layout":"fixed"});
/* scroll */
$("#rb"+lId).scroll(function(){
$("#rh"+lId).scrollLeft(this.scrollLeft);
$("#lb"+lId).scrollTop(this.scrollTop);
});
});
}})(jQuery);
Step 4: Create an Dynamic action with the settings as mentioned below.
a. Create "set scroll" dynamic action with event as "After Refresh" and Region as your classic report region.

b. Create Action as "Execute Javascript Code" and apply the below mentioned code.
$("#report_NADD_PIPELINE").htmldbDscroll({freezeColumns:1});
Where NADD_PIPELINE is the STATIC_ID of my classic report.
Note: freezeColumns:1 in the above function will fix the 1st column. In-case you need to fix first 2 or 3 columns then change its numbering to 2 or 3 accordingly (ex: freezeColumns:2).

Step 5: You are all good to go and test your report header freeze functionality :)