Hi,
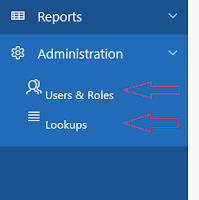
There is an issue with the Side Navigation Menu Child Entry Icon Alignment in Universal theme if you are using APEX 5.1 or prior versions. Below image describes more about the icon alignment issue.
This can be fixed by an simple CSS. Below is the code.
/*CSS for Side Menu Child Entry Icon Alignment Fix */
.t-TreeNav .a-TreeView-node--topLevel .a-TreeView-node .fa {
line-height: 32px;
}
As we need to apply this CSS globally to the application you can save this code as css file and upload it under Application Static files. Then refer it in 'Shared Components => User Attributes => Edit User Interface => CSS File URLs section' of your application.
This is how it looks after applying the CSS.

This alignment issue has been fixed in the next version of APEX (i.e 18.1).But if you are still using the old version (i.e 5.1 or prior) then this workaround will save you. Hope this helps.
Cheers,
Prashanth
There is an issue with the Side Navigation Menu Child Entry Icon Alignment in Universal theme if you are using APEX 5.1 or prior versions. Below image describes more about the icon alignment issue.

This can be fixed by an simple CSS. Below is the code.
/*CSS for Side Menu Child Entry Icon Alignment Fix */
.t-TreeNav .a-TreeView-node--topLevel .a-TreeView-node .fa {
line-height: 32px;
}
As we need to apply this CSS globally to the application you can save this code as css file and upload it under Application Static files. Then refer it in 'Shared Components => User Attributes => Edit User Interface => CSS File URLs section' of your application.
This is how it looks after applying the CSS.

This alignment issue has been fixed in the next version of APEX (i.e 18.1).But if you are still using the old version (i.e 5.1 or prior) then this workaround will save you. Hope this helps.
Cheers,
Prashanth


